
The Ichiban Selecter Coffee Brewing Method
The easiest way to taste everything that your beans can deliver.
INTRODUCTION
When Covid hit in 2020 I started to get really serious about coffee. I found myself with copious amounts of free time and nowhere to go. And you can’t just sit at home and eat— you get fat. Enter coffee: the comparatively low calorie way to happiness! As any coffee nut will tell you, the endless mixture of variables means you’ll never get bored either. The only problem is that I’m not the personality that just wants to try things for the sake of novelty. I want something good.
For the past year I’ve tried pourovers with V60s & melitas, the Aeropress, stovetop espresso makers, French presses, and espresso machines. I’ve tried upwards of 100 varieties of coffee beans. The closest (and best tasting) method to my preference was the French press. Just water and grinds, then pour into the cup after the optimum time. But damn if the cleanup doesn’t suck. So many parts and pieces and the constant fear that the glass will get knocked and broken. How could I get something to hold the grinds without all the production?
For a time I went back to pour overs using various papers. Less hassle than the French press and still pretty direct, but each paper made the same beans taste different. And all the variables of how to pour the water and how long to let it steep and with how much water each time. It was maddening. I even bought a V60 with a valve to time different immersions. Was it a fun process. Not really. Did any of those combinations hit my sweet spot? No.
Then I stumbled across a video of professional coffee tasters cupping. Cupping is simply putting the grounds into a cup, pouring water over them, letting them sit and sink, and then tasting. Then it hit me. If this is how the pros actually select the best beans, why the hell am I not making my coffee the same way?
I’d already experimented with so many methods that each seemed put a barrier between the beans and the water. What is the least barrier I could get to immersing the grinds like in cupping? Then it hit me— tea brewing. How different could tea brewing be than coffee? Same idea right? So I pulled out my tea ball and tried it. Damn, that actually tasted good! But the holes were way too big and there was a lot of sludge left in the cup. Not ideal.
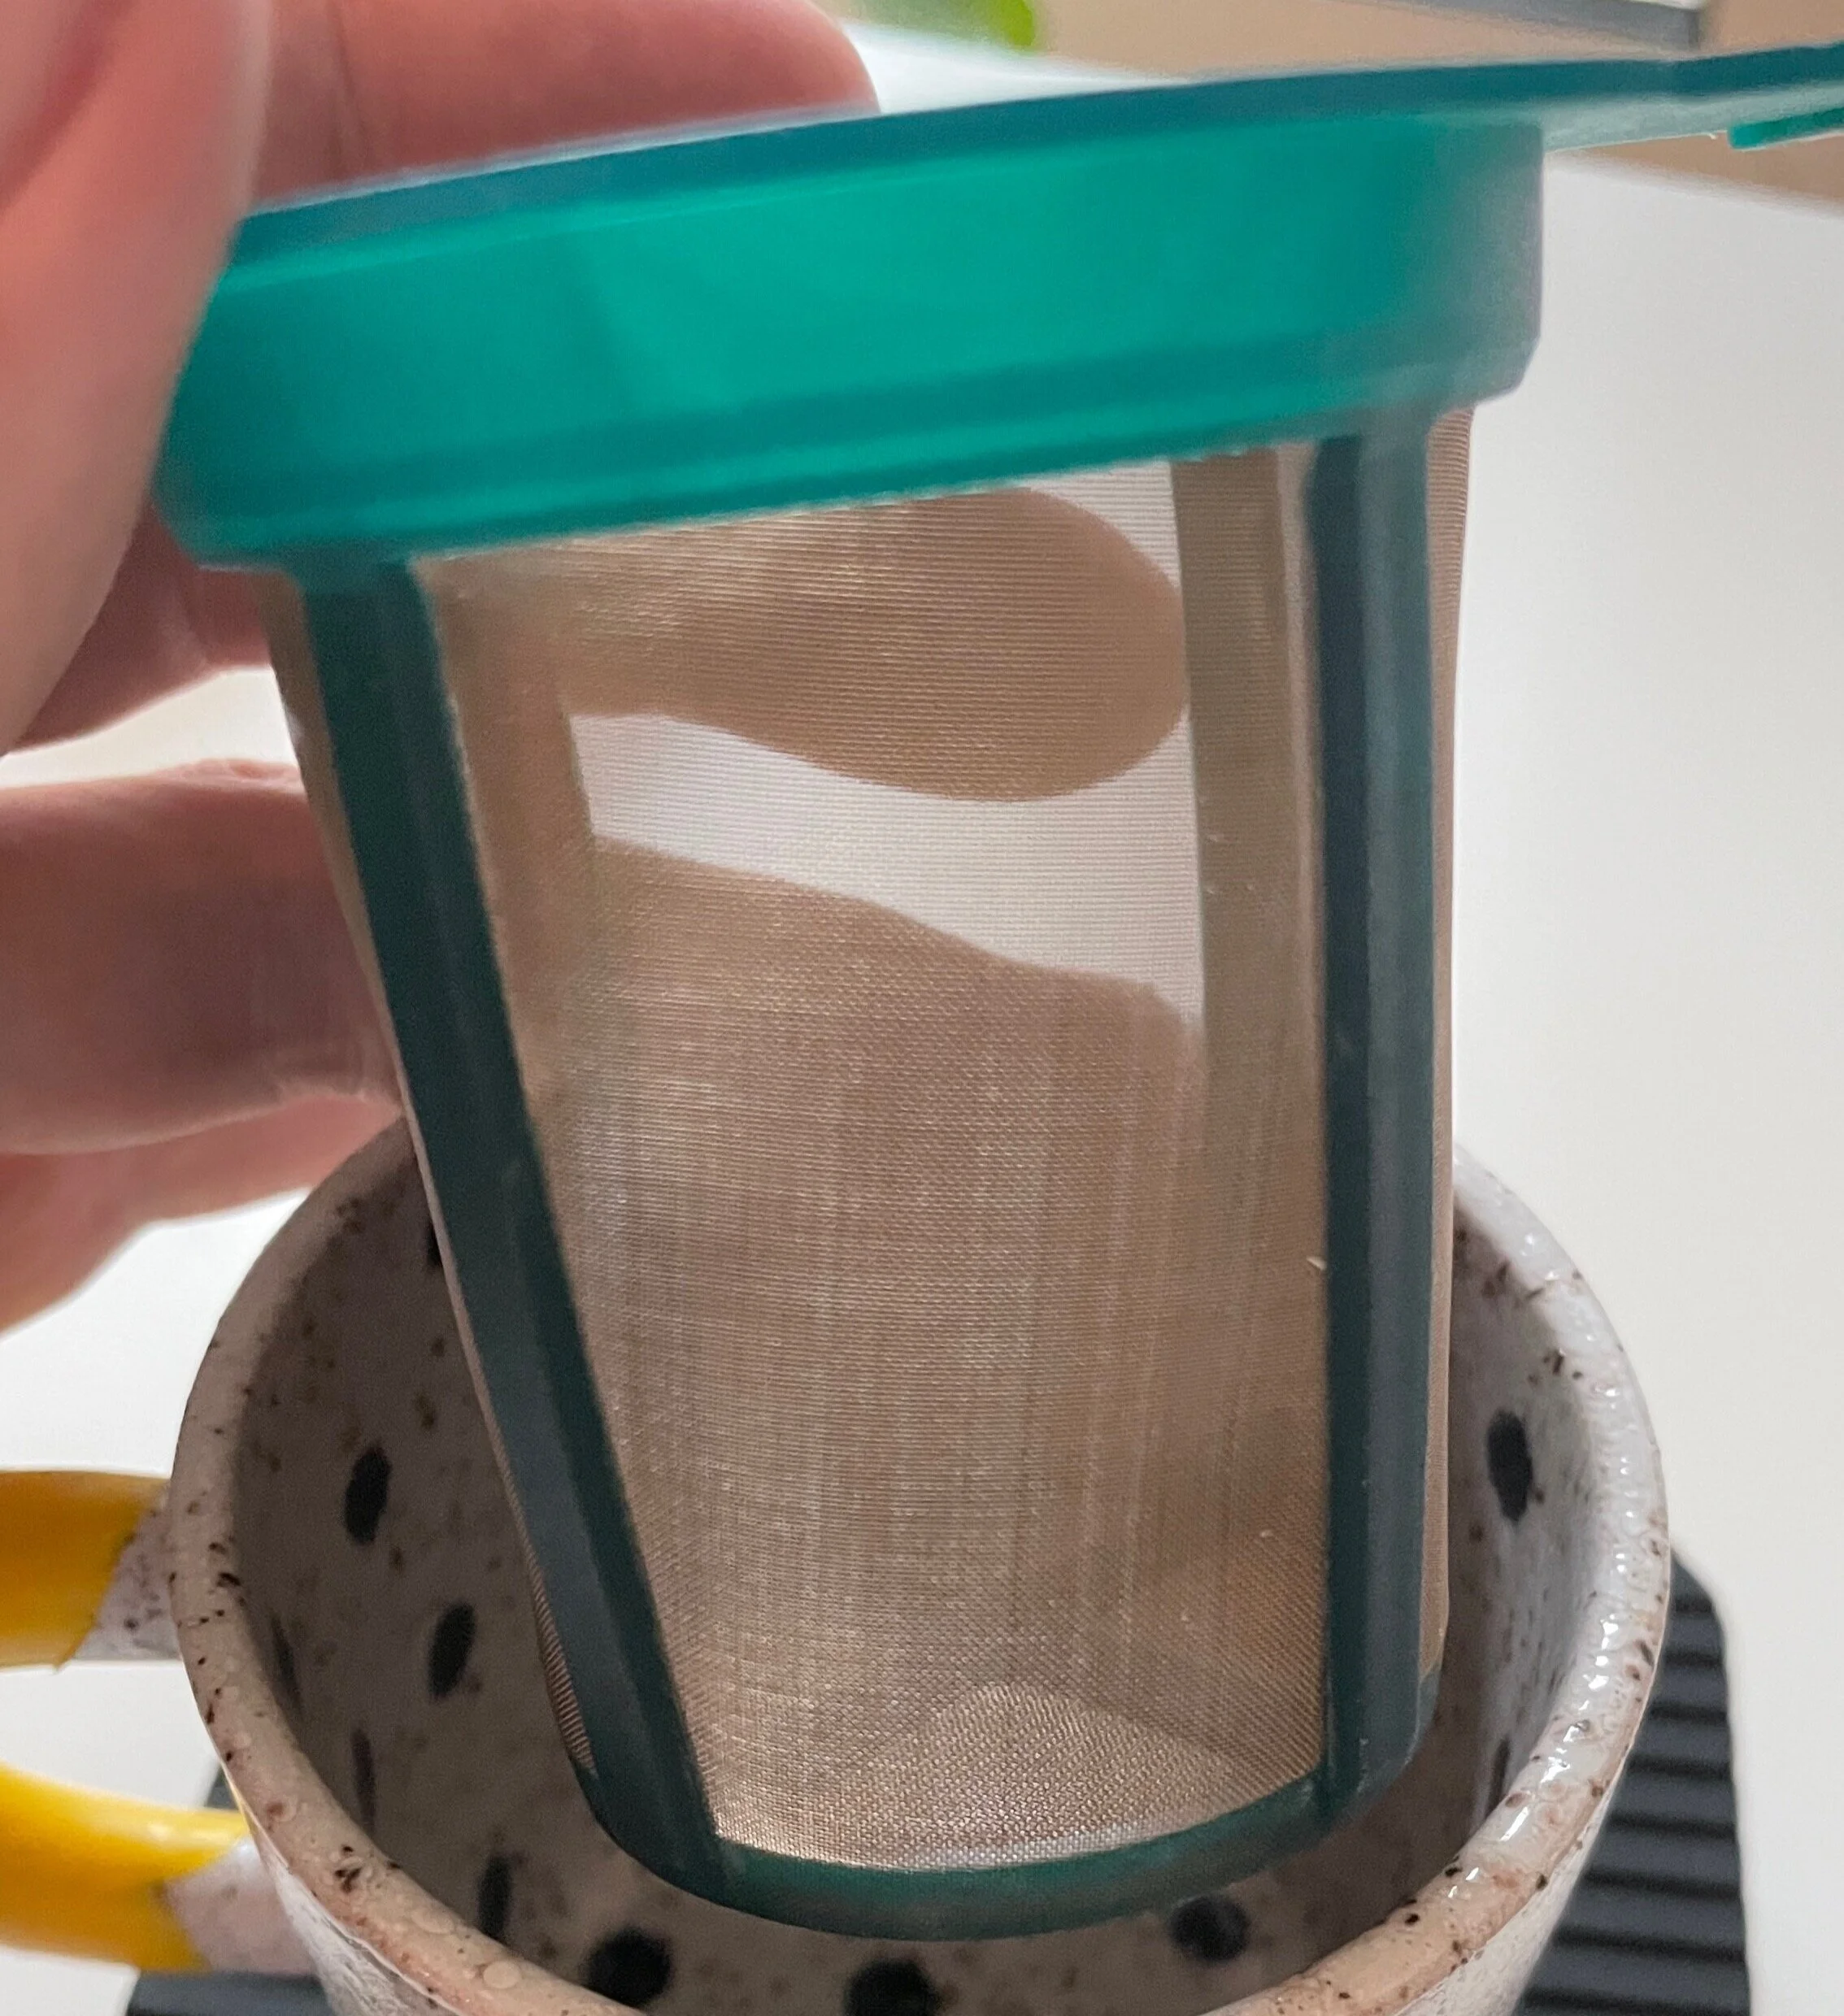
Enter Google. It turns out there is a company called Finum that makes an ultra fine mesh tea infuser. I bought a set. When they arrived I inspected the mesh— very fine.
At the time I was using the legendary Detour Los Rosales beans so decided to go for the goal and do an espresso grind. Let’s see what this filter can handle! Well, the result was mind-blowing. A cup of coffee so flavourful strong and with the thickness of an espresso but without any bitterness or sourness. Thus became my de facto coffee brewing (and tasting) method.
For your pleasure here are the steps:
GRIND THE BEANS

Choose a medium to fine grind based on your beans

Zero your scale with the grinder on
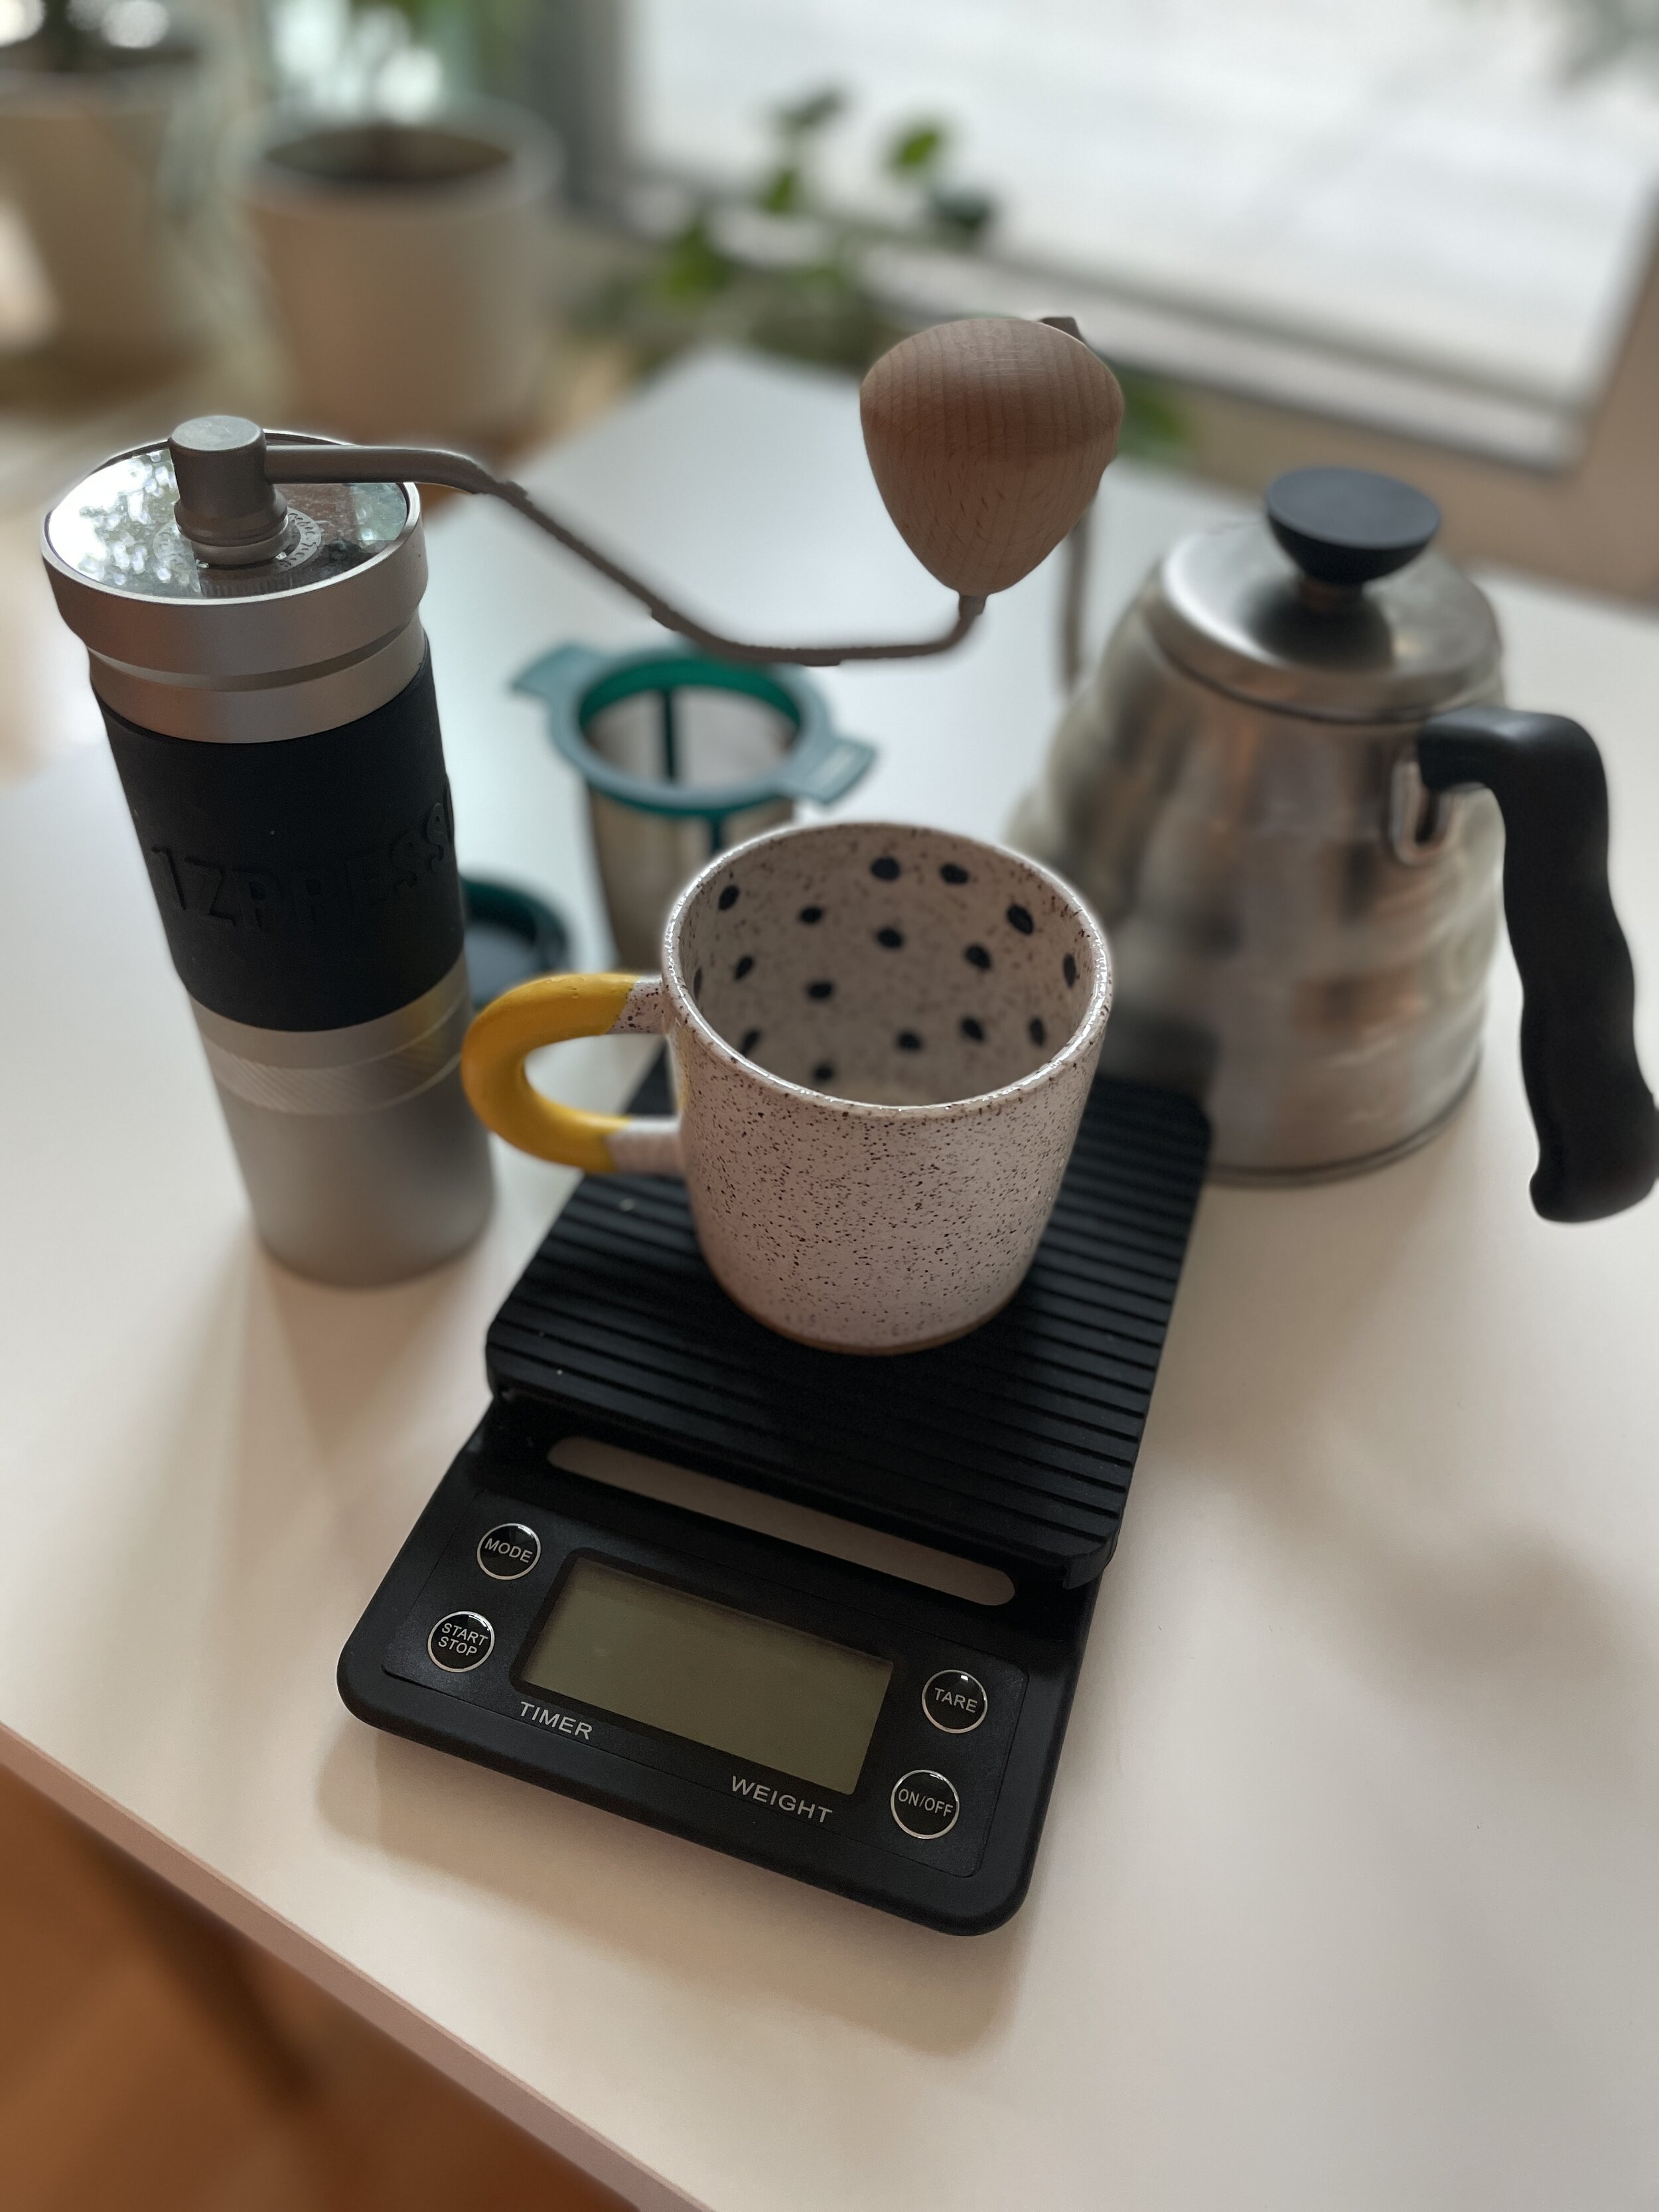
I use the wonderful 1Zpresso JX-Pro to grind my coffee. I don't make large amounts so it’s more than up to the task of quantity and the burrs are fantastic for dialling in the appropriate grind size for any bean variety. Grind size certainly makes a monumental difference so it’s well worth getting a good grinder if you want to hone in on your perfect cup. Something like the JX-Pro will last a lifetime and it feels great to use.
Most baristas agree that somewhere around 1:16 or 1:17 ratio of grinds to water is optimum. For my purposes I choose to grind 8 grams of coffee for 130 grams of water. This gives a slightly thicker, more robust brew. You can adjust as you need along side time to brew and grind size.


I always try to grind as finely as possible in order to give the largest surface area to water ratio possible. This allows you to do a shorter brew, keeping the temperature high, however every bean is different and you can dramatically change the taste of any bean by changing the grind size. The mesh on the Finum is quite fine, but at a certain point you will get sludge and also the conduction of water inside the filter to outside will be impeded. It’s easy to adjust and experiment.
BREW
I boil my water in a Hario kettle I bought for pour-overs but with this method it’s not very important how you pour the water so you can use any kettle. I test the water temperature only as to when the lid of the Hario starts jumping. You can of course use a thermometer if you want to really experiment with temperature, but in general I’ve found the hotter the better and it seems the kettle jumps and doesn’t get hotter.

Zero the scale with the grinds in the cup and start the timer.

Pour until you get your desired weight.
1 millilitre of water weight 1 gram so it’s very easy to calculate how much water you need to pour based on your grind weight and the size of your cup. I tend to make lattes so I like 125 millilitres of coffee and 125 millilitres of foamed milk, making 250 millilitres total. For US readers, that’s a standard cup. If you want a full cup of just coffee, use 16 grams of grinds for example.


A normal 250 millilitre cup is really perfect for the Finum because the filter becomes almost completely immersed in the brewing water. This gives you a constant contact between water and beans for the entire process, most similarly to the French press. I experimented with a swirl after preset times but found that leaving it alone works best.

Cover the filter using the included top to keep the heat in.
After trying many many different beans and brew times, I’ve concluded that the optimum brew time is either 3 minutes or 7 minutes. 3 minutes yields a light and nuanced cup which is visibly thinner and lighter on the tongue. It’s not really suitable for mixing with milk, but is wonderful for people who drink their coffee black and want to taste all the flavours, especially those of fruit, floral etc. If you like Ethiopian coffee for example, you might really like the shorter brew time.
The 7 minute brew provides an almost espresso thickness cup which has gobs of flavour and viscosity. I like it on its own, but it really holds up well when mixing with milk. Having tried about a hundred espressos from premier shops, I just can’t get past the ubiquitous bitter or sour acidity that it brings. It seems to dominate any of the nuance of the beans to me. I don’t get it. If you can get more flavour another way without any downside, it seems to me that is a better way to go. Perhaps I’ll see the espresso light someday…
In any case, the 7 minute method has all the up sides of espresso but it reduces the bitterness or sourness (depending on your bean style) to an equal or less flavour factor than the other inherent flavours in your beans.
THE FINISH
When you reach your desired timing, it’s very important to pull out the filter basket quickly. Don’t let it all drain until dry. I’ve found that these “remnant” drops contain the bitter or sour components of the grinds. If you want that, then let it drain. But I don’t. I’m happy to sacrifice 5 grams of coffee extraction each time to get the smoothest tasting cup.
At 5 minutes I heat my milk in my manual milk frother. You can’t really make latte art with it, but the taste is just as good.


The resulting coffee is great. One thing I like is that the oils from the beans are maintained, unlike with a paper filter. This gives more nuance to the taste.


CONCLUSION
There are number of distinct advantages to using the immersion filter method:
Same taste as a French press without the annoying cleanup. Just bang the grinds into the garbage when finished and rinse out the filter basket. I throw it in the dishwasher daily to keep it really clean.
Complete control over grind size, brewing time, water temperature, water pouring, degree of immersion vs. drip. If you’re a precise person you can get great results from any bean and world class results from the best beans. No more bad cups.
It’s incredibly cheap. Ignoring any fancy kettle or grinder, this method is the single cheapest way to brew coffee. You can find the Finum filters for around $20. There’s no waste and nothing to break or maintain. It’s incredibly high value. Considering a “good” espresso machine starts around $2000, you’re crazy not to at least try this method before making an investment.
It’s portable. On a recent 3 week road trip through parts where there wasn't even a Tim Hortons, you can just take your filter basket. There’s always a cup and hot water in a hotel room. Washing is a cinch. And it takes less room than an Aeropress.
You can make variable amounts of coffee easily. If you want to use it as an espresso fill-in, make a full cup, or even use it as a dripper for 3-4 cups over a carafe, one small device does it all. The Finum double pack is ideal for his and hers.
Overall, even if this wasn’t the easiest and cheapest method, I still prefer it to any other coffee I’ve yet tasted. As a review tool, it is a perfect benchmark to judge a first taste of a bean, and through tweaking the process, it’s always possible to maximize the flavour extraction to get the most from each bean in the most expedient way. Sometimes less machine does yield more taste.
PRICE
$20-$400 USD
AVAILABILITY
THE RATING
9/10 Absolute
10/10 Relative
Your donation helps keep the reviews coming!